커스텀 뷰
2023. 1. 29. 11:20
Java 버전 에러
2022. 12. 21. 16:29
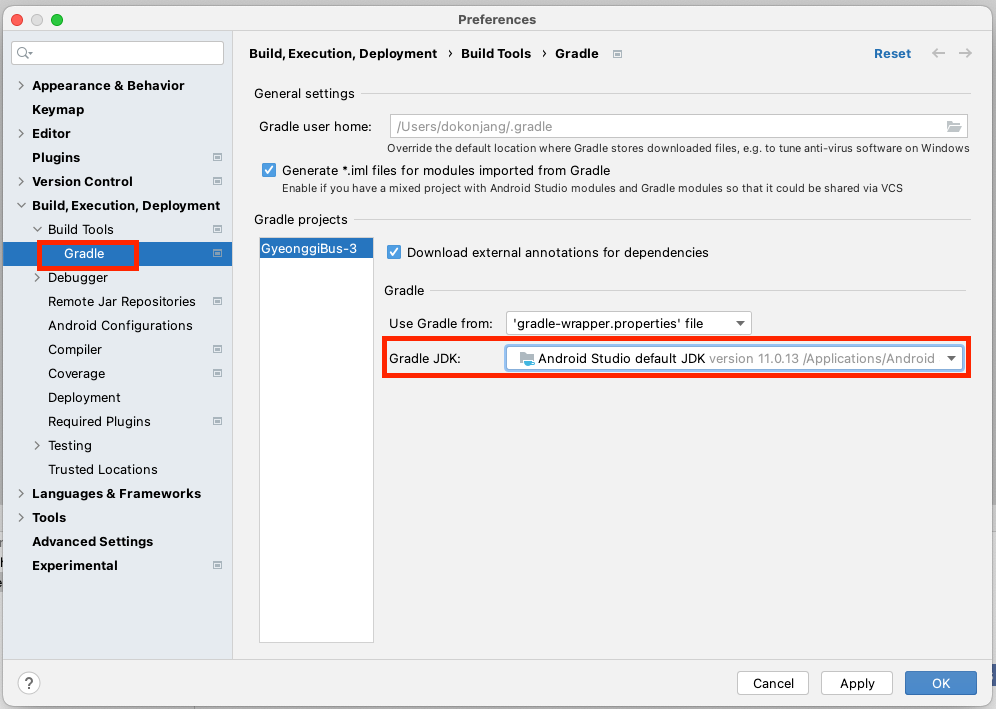
java.lang.UnsupportedClassVersionError: com/android/tools/idea/gradle/run/OutputBuildAction has been compiled by a more recent version of the Java Runtime (class file version 55.0), this version of the Java Runtime only recognizes class file versions up to 52.0
OutputBuildAction 클래스가 55 에서 컴파일 되었고, Java Runtime은 52라서 오류가 발생
안드로이드스튜디오의 Java 버전을 변경하여 해결
'기타' 카테고리의 다른 글
| 특정 브랜치 클론 (0) | 2022.11.13 |
|---|---|
| Git 설치 (0) | 2022.11.13 |
| admob - app-ads.txt 설정 (0) | 2022.07.16 |
| Button 배경색이 변경되지 않을 경우 (0) | 2022.05.27 |
| Apache License 2.0 (0) | 2022.04.05 |
특정 브랜치 클론
2022. 11. 13. 22:04
Git(깃)을 이용하여 프로젝트 관리시 Master(마스터)가 아닌 Develop(디벨로퍼)으로 생성하여 개발 후 Test 를 위해 Git Clone이 필요한 경우가 있다.
그런 경우 기본적으로 알고 있는 방법으로 Git Clone을 하는 경우 Master가 바로 Clone(클론)이 됨에 따라, Develop과 같이 특정 Branch(브랜치)를 Clone 하는 방법을 알아보도록 하자.
- $ git clone -b <branch명> <remote_repo 주소>
# git clone -b <branch명> <remote_repo 주소>


$ git clone -b develop https://github.com/project/test.git
Cloning into 'test'...
Username for 'https://github.com': xxxxx
Password for 'https://xxxxx@github.com':
remote: Enumerating objects: 52, done.
remote: Counting objects: 100% (52/52), done.
remote: Compressing objects: 100% (42/42), done.
remote: Total 3084 (delta 21), reused 34 (delta 10), pack-reused 3032
Receiving objects: 100% (3084/3084), 5.22 MiB | 0 bytes/s, done.
Resolving deltas: 100% (1899/1899), done.
'기타' 카테고리의 다른 글
| Java 버전 에러 (0) | 2022.12.21 |
|---|---|
| Git 설치 (0) | 2022.11.13 |
| admob - app-ads.txt 설정 (0) | 2022.07.16 |
| Button 배경색이 변경되지 않을 경우 (0) | 2022.05.27 |
| Apache License 2.0 (0) | 2022.04.05 |
Git 설치
2022. 11. 13. 21:58
1. Git 다운로드 및 설치
Git - Downloads
Downloads Mac OS X Windows Linux/Unix Older releases are available and the Git source repository is on GitHub. GUI Clients Git comes with built-in GUI tools (git-gui, gitk), but there are several third-party tools for users looking for a platform-specific
git-scm.com
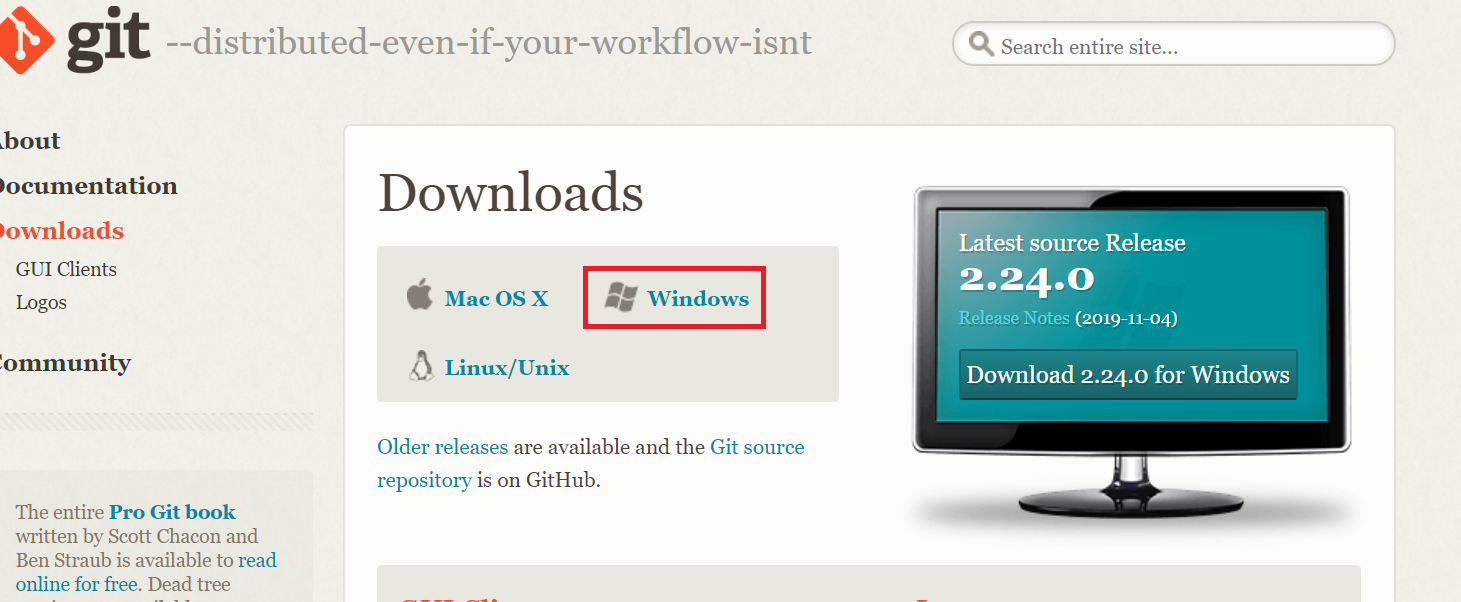
Windows 를 눌러 다운
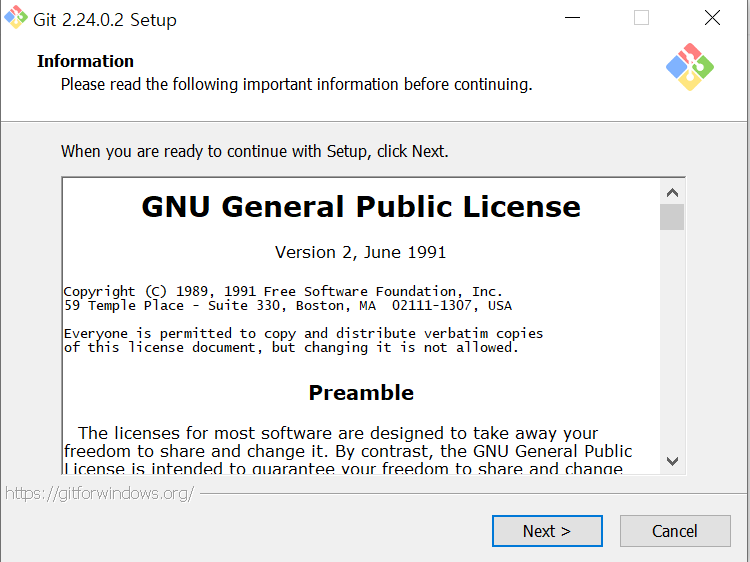
다운받은 Git-2.24.0.2-64-bit.exe 를 실행
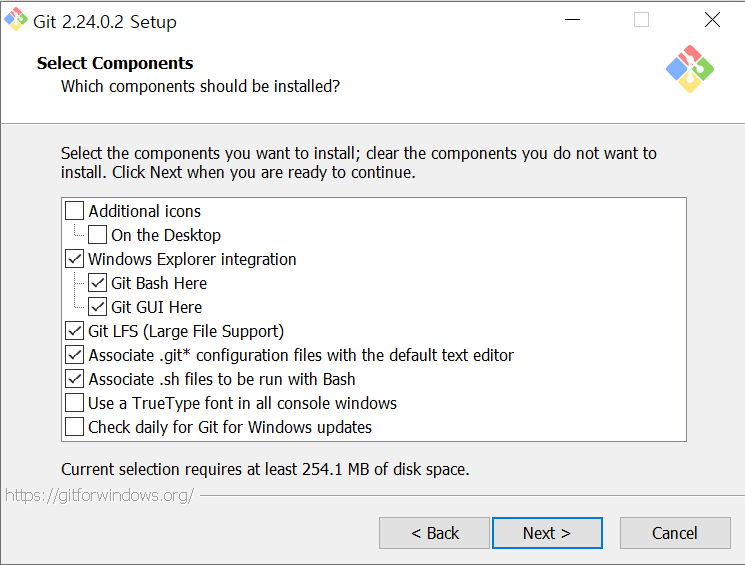
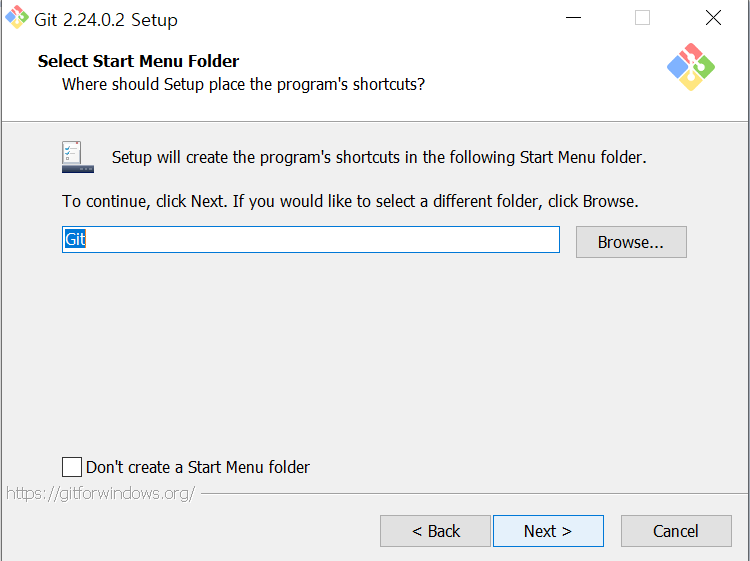
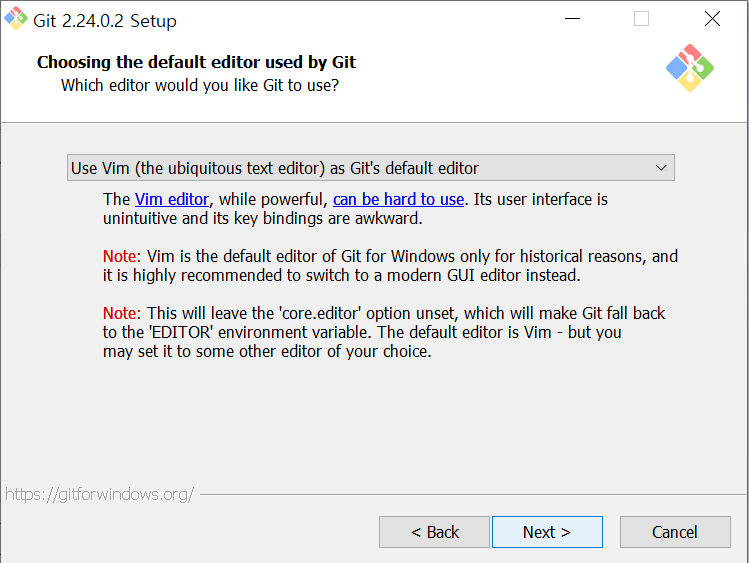
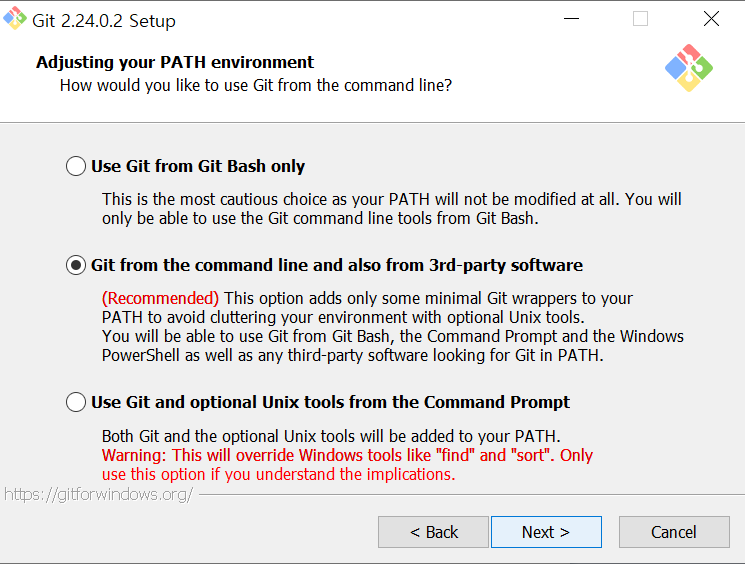

Use the OpenSSL library : OpenSSL 라이브러리 사용. 서버인증서는 ca-bundle.crt 파일을 사용
Use the native Windows Secure Channel library : Windows 인증서 저장소 사용
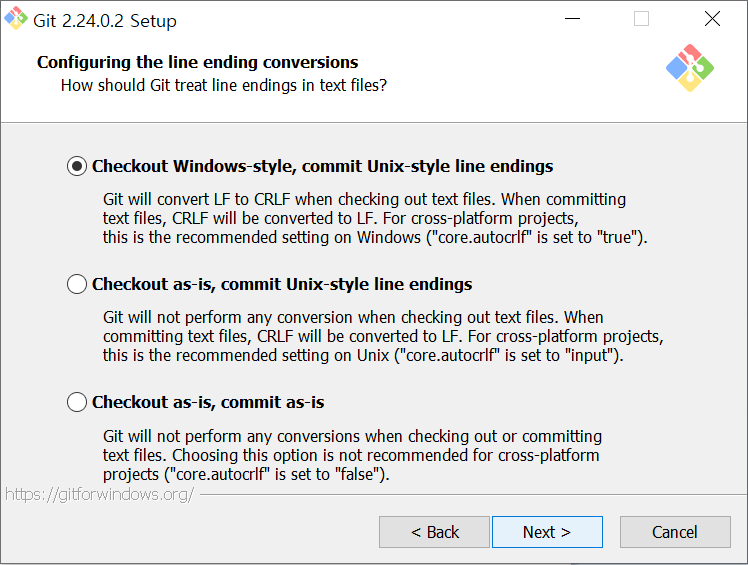
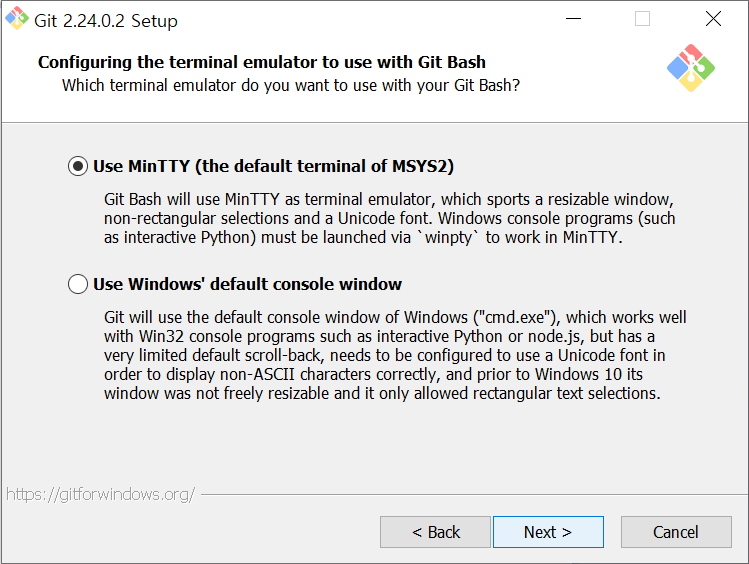
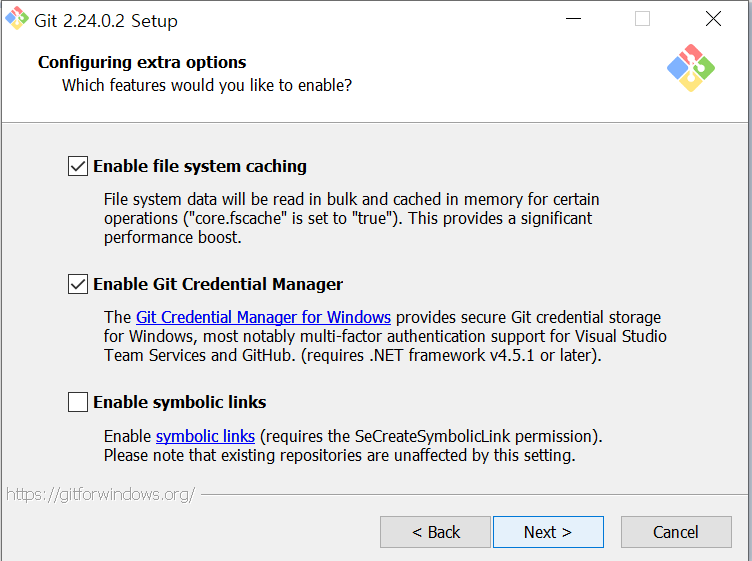
Enable file system caching : 성능향상을 위해 파일 시스템 데이터를 메모리에 캐시
Enable Git Credential Manager : Windows 용 보안 Git 자격증명 저장소를 사용
Enable symbolic links : symbolic links 활성화(기존 저장소는 영향을 받지 않음)
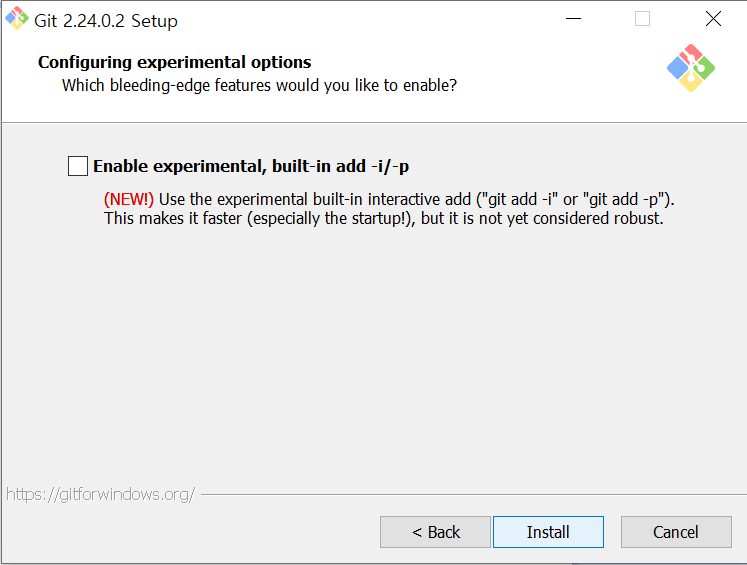
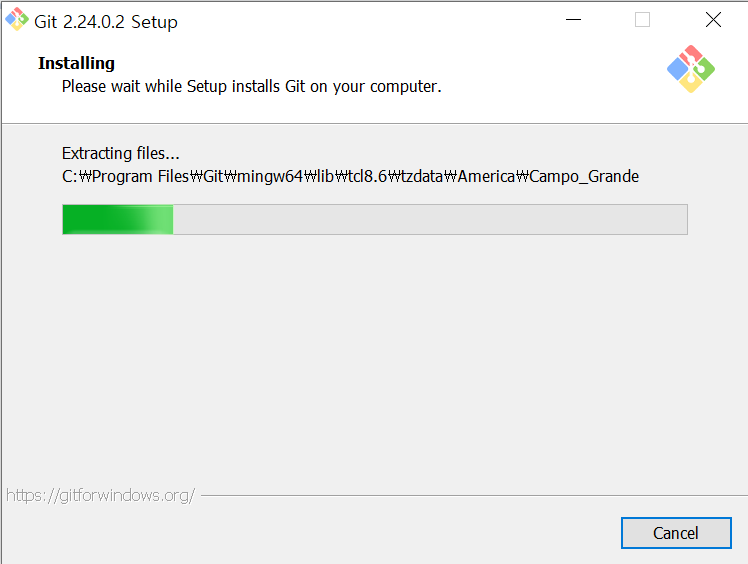
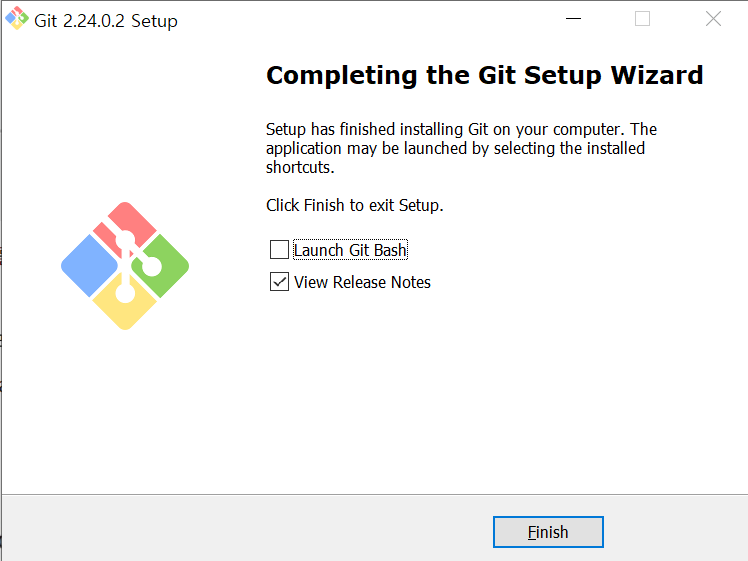
이제 다시 cmd를 열고 한번 더 git 명령을 쳐 확인
git 설치 전에 cmd가 열려 있었다면 닫고 다시 열어야 한다
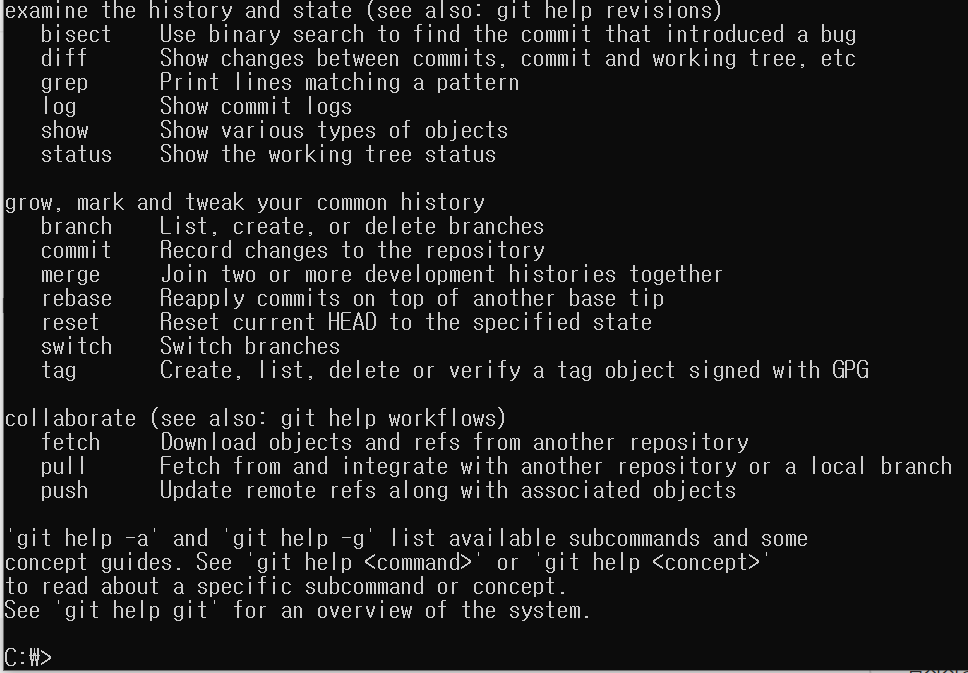
이렇게 나온다면 git 설치가 완료 된것이고 android studio 에서도 실제 git 을 사용할 수 있다.
혹시나 저렇게 나오지 않는다면 "시스템환경변수" 에 git의 Path 를 추가
2. path 추가
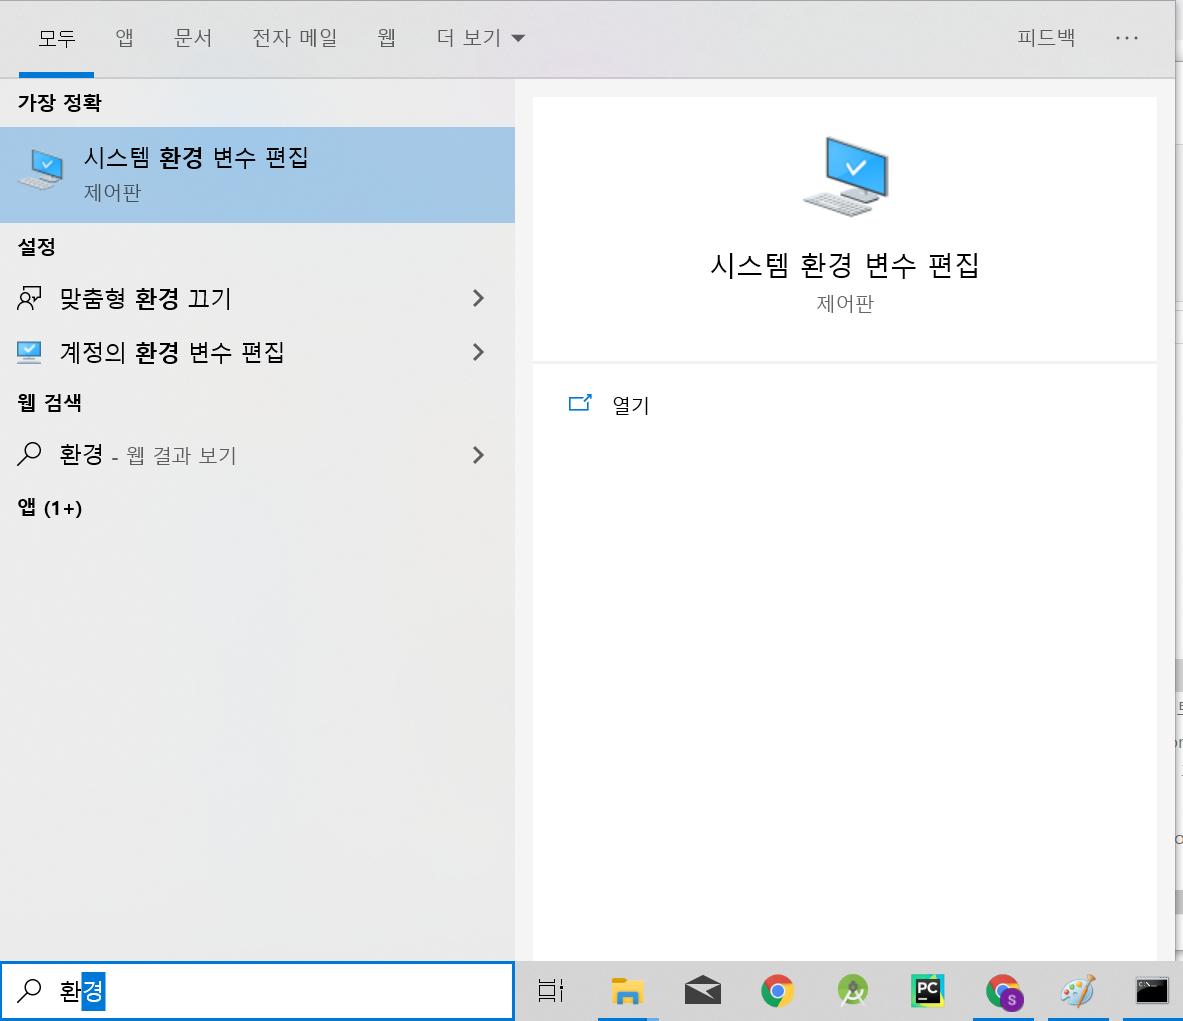
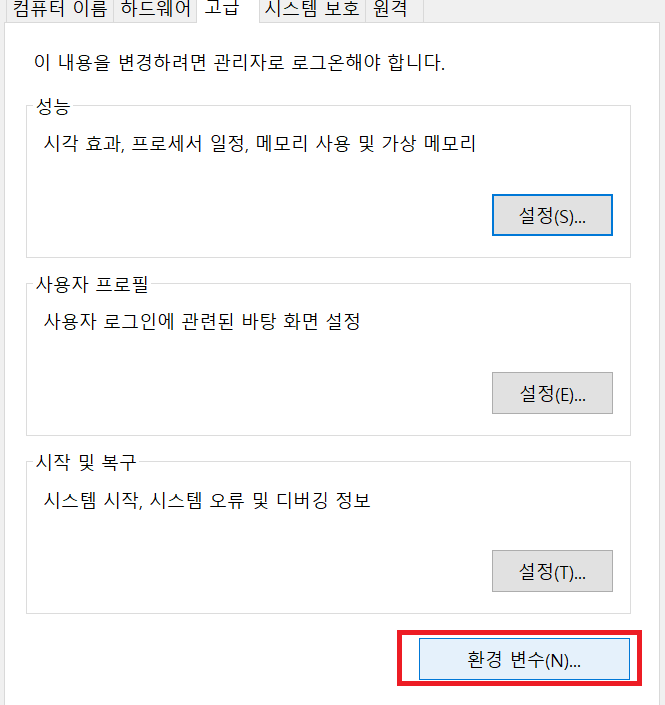
환경변수 클릭.
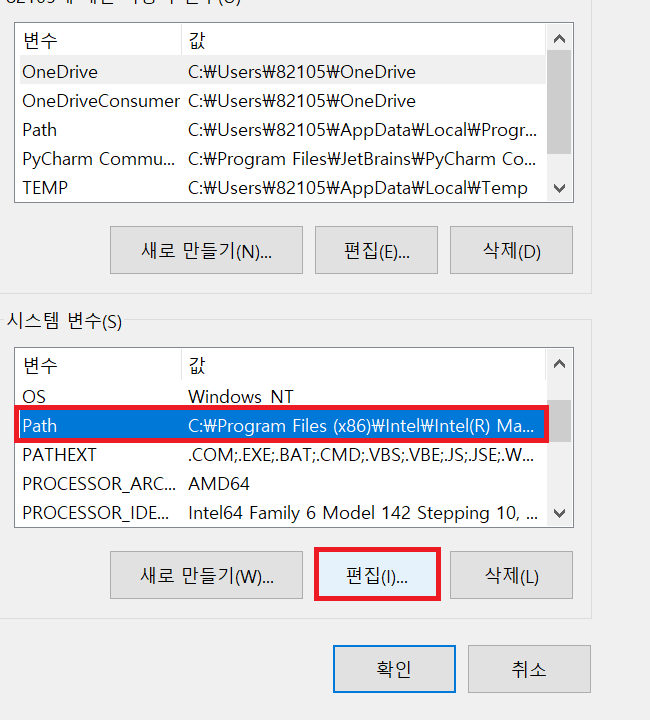
하단 시스템 변수에서 Path 를 누르고 편집 클릭.
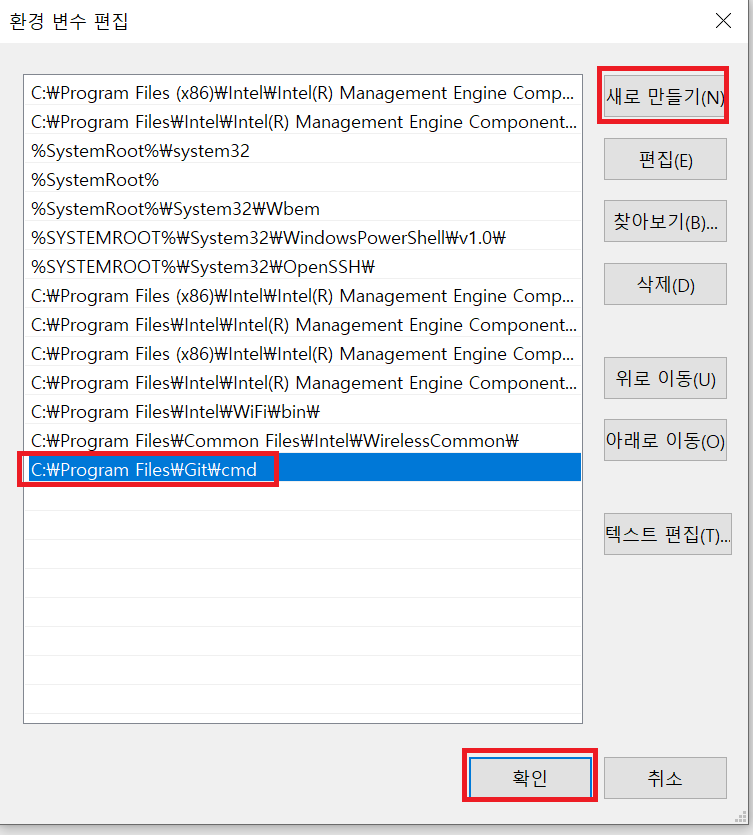
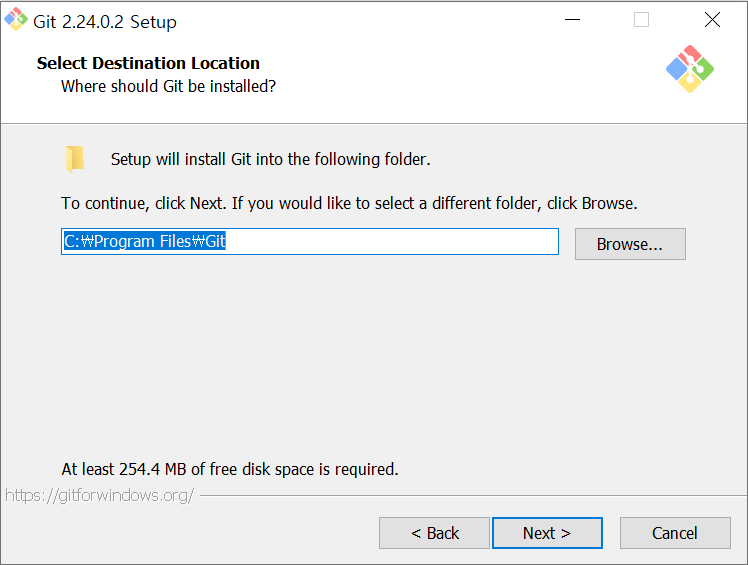
설치 시 경로를 기본으로 했다면 위와 같이 입력
C:\Program Files\Git\cmd
그리고 cmd 가 열려있다면 닫고 다시 실행 후 git
이제 git 프로젝트 복사도 cmd 창에서 git clone http://some_git_url
'기타' 카테고리의 다른 글
| Java 버전 에러 (0) | 2022.12.21 |
|---|---|
| 특정 브랜치 클론 (0) | 2022.11.13 |
| admob - app-ads.txt 설정 (0) | 2022.07.16 |
| Button 배경색이 변경되지 않을 경우 (0) | 2022.05.27 |
| Apache License 2.0 (0) | 2022.04.05 |
RecyclerView - item 위치 찾기
2022. 8. 6. 10:29
val lastVisibleItemPosition = (recyclerView.layoutManager as LinearLayoutManager)
	.findFirstVisibleItemPosition()

val lastVisibleItemPosition = (recyclerView.layoutManager as LinearLayoutManager)
    	.findLastVisibleItemPosition()

val lastVisibleItemPosition = (recyclerView.layoutManager as LinearLayoutManager)
    	.findFirstCompletelyVisibleItemPosition()

val lastVisibleItemPosition = (recyclerView.layoutManager as LinearLayoutManager)
    	.findLastCompletelyVisibleItemPosition()
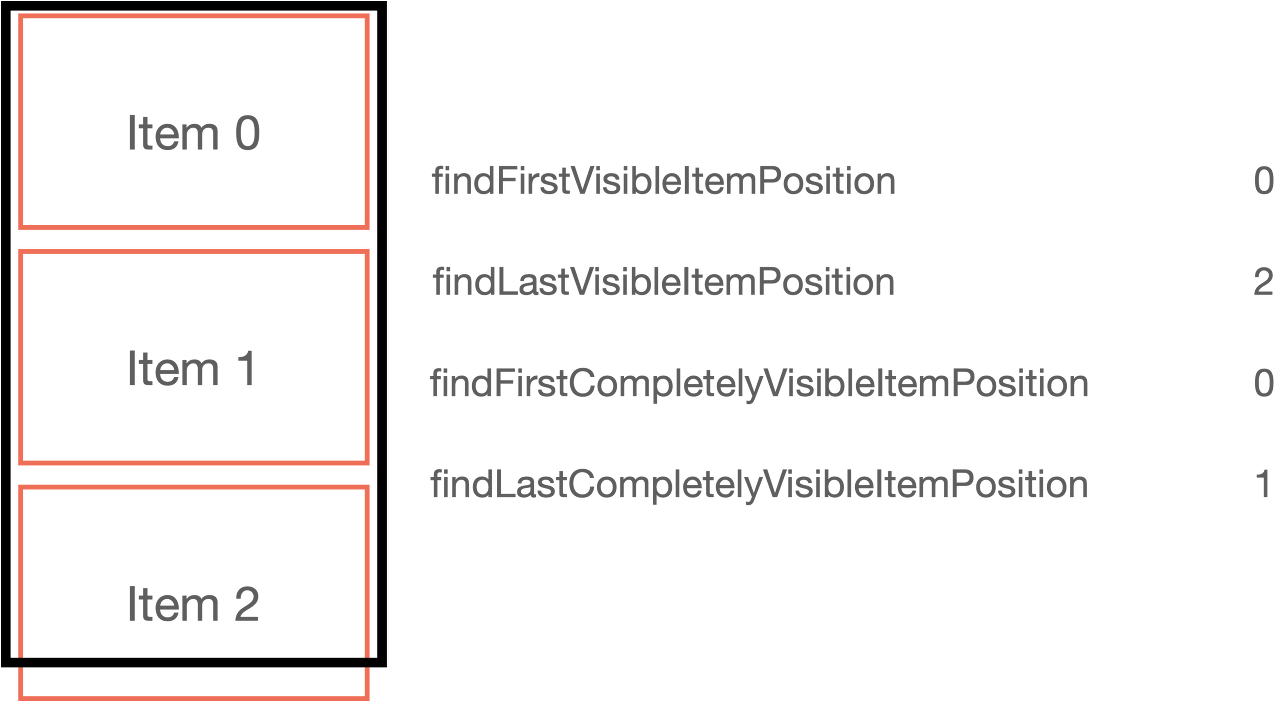
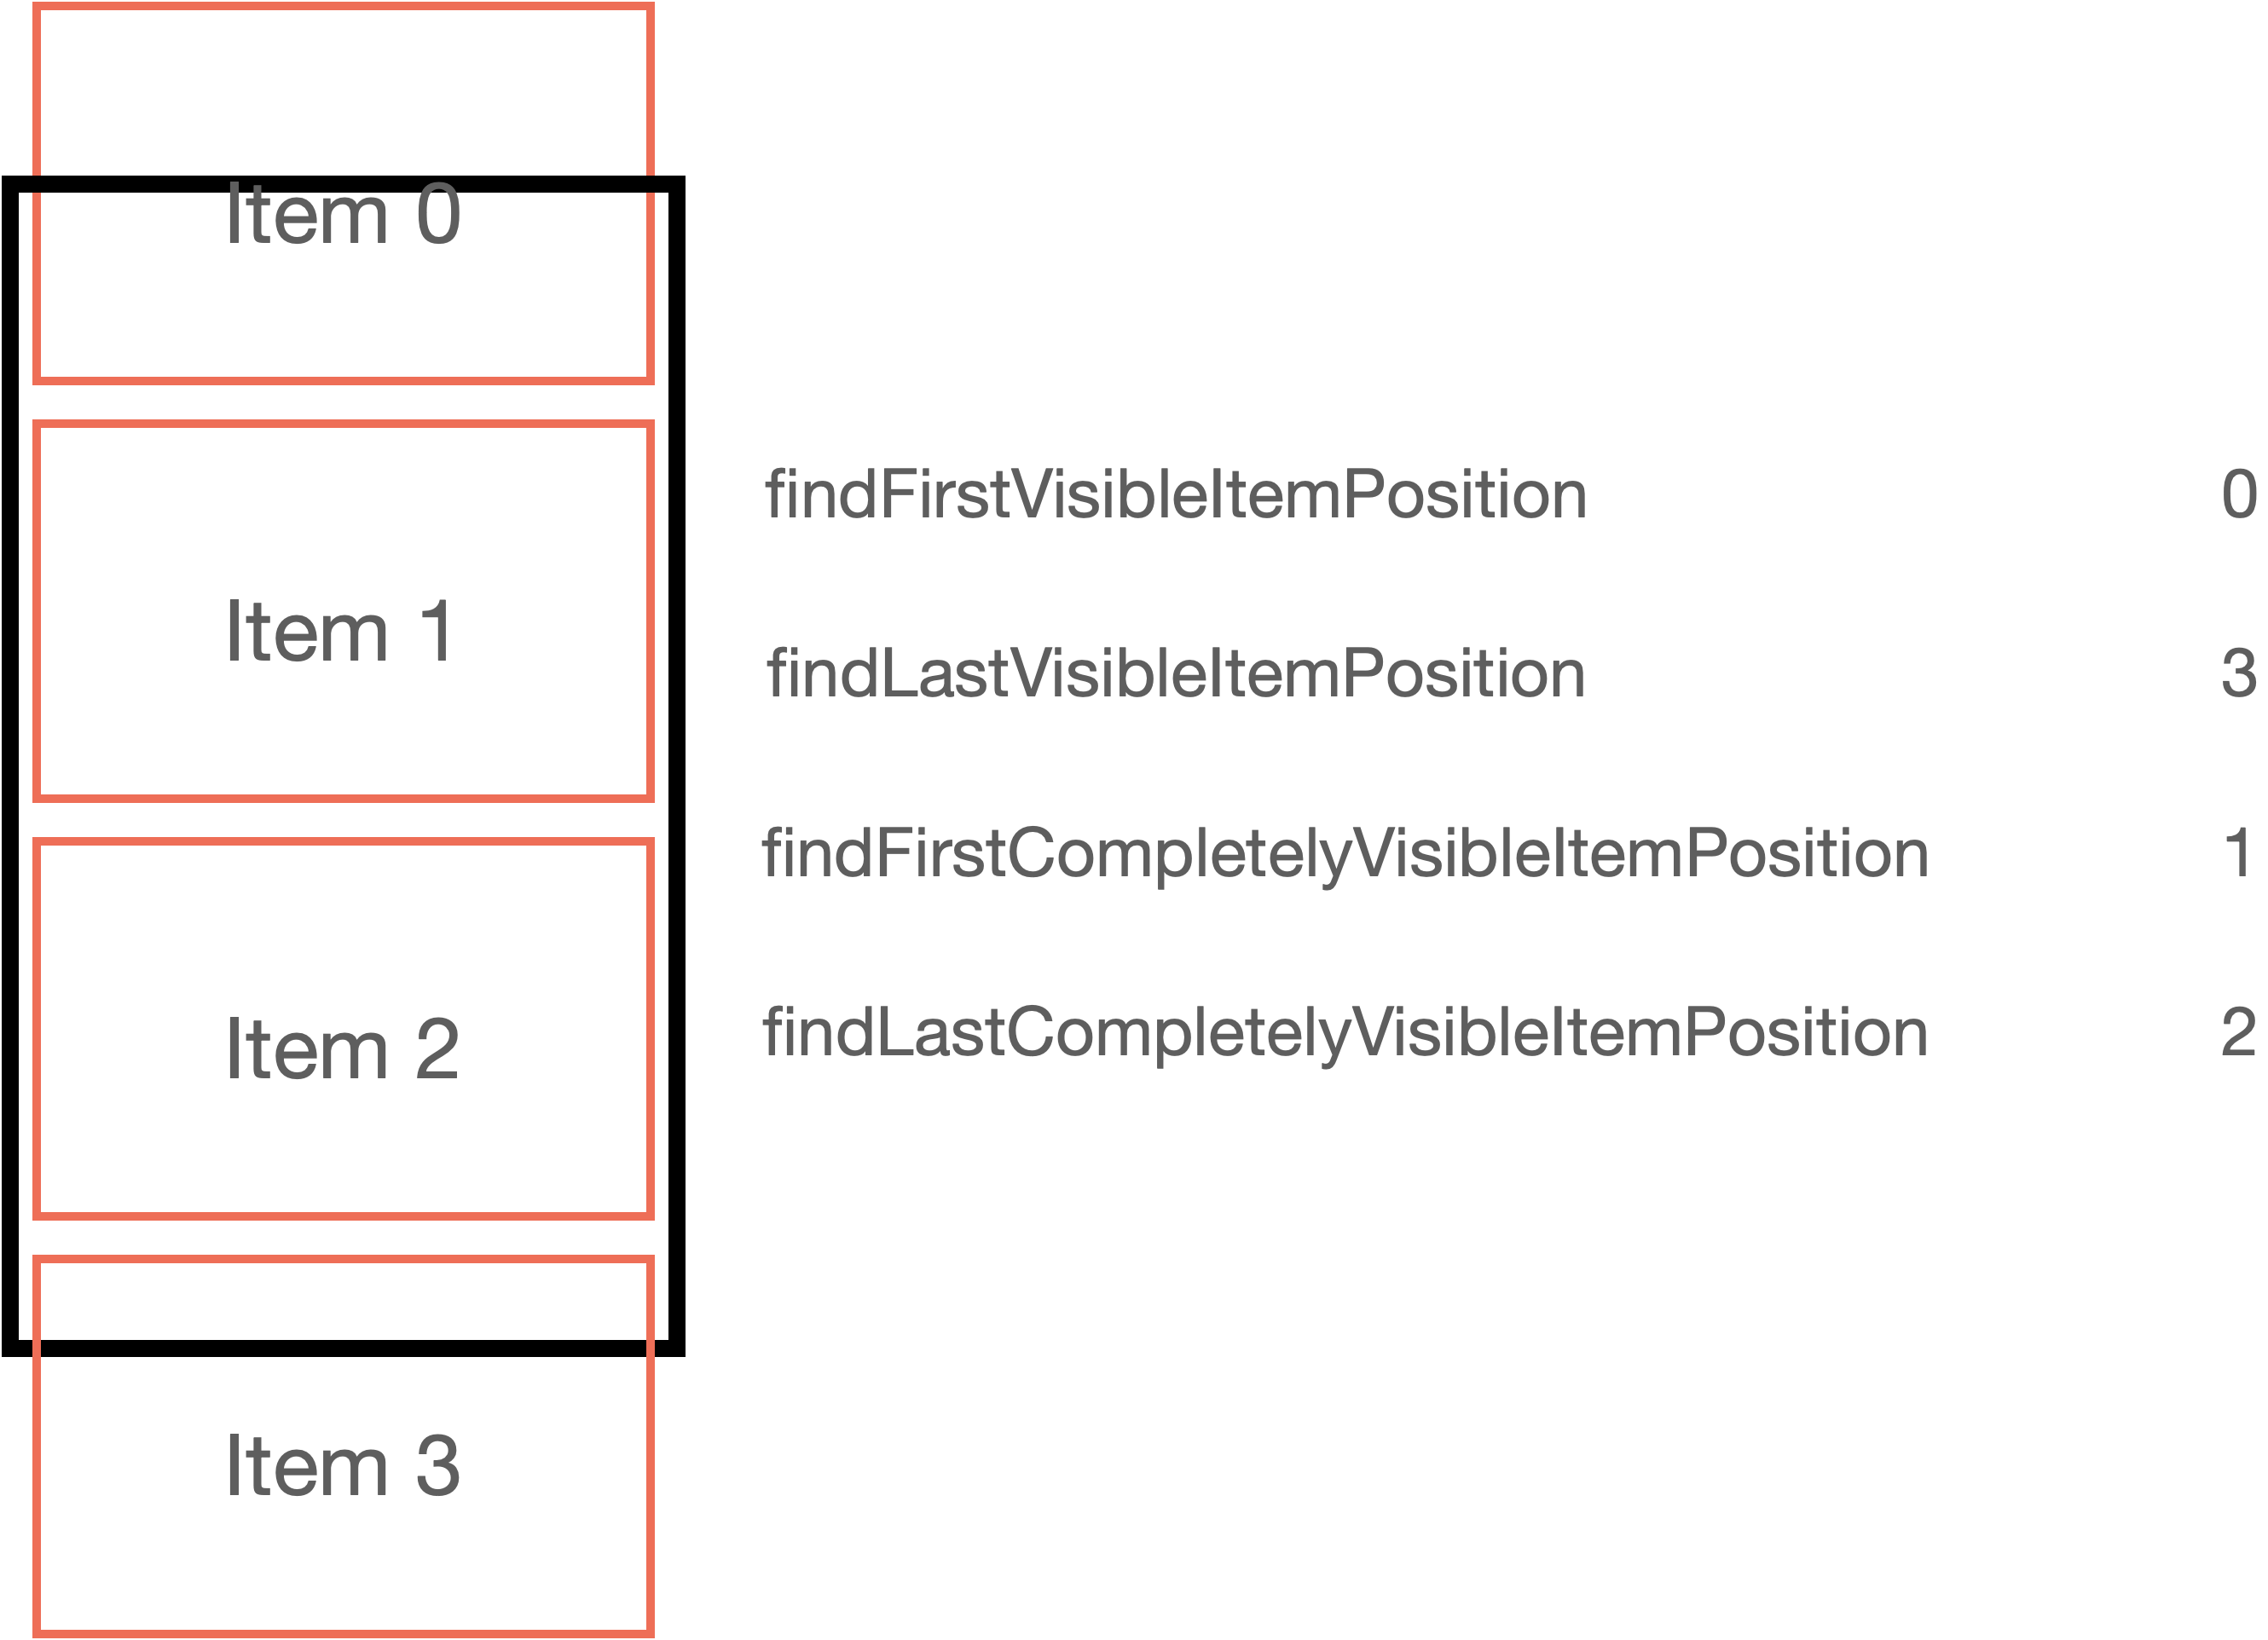
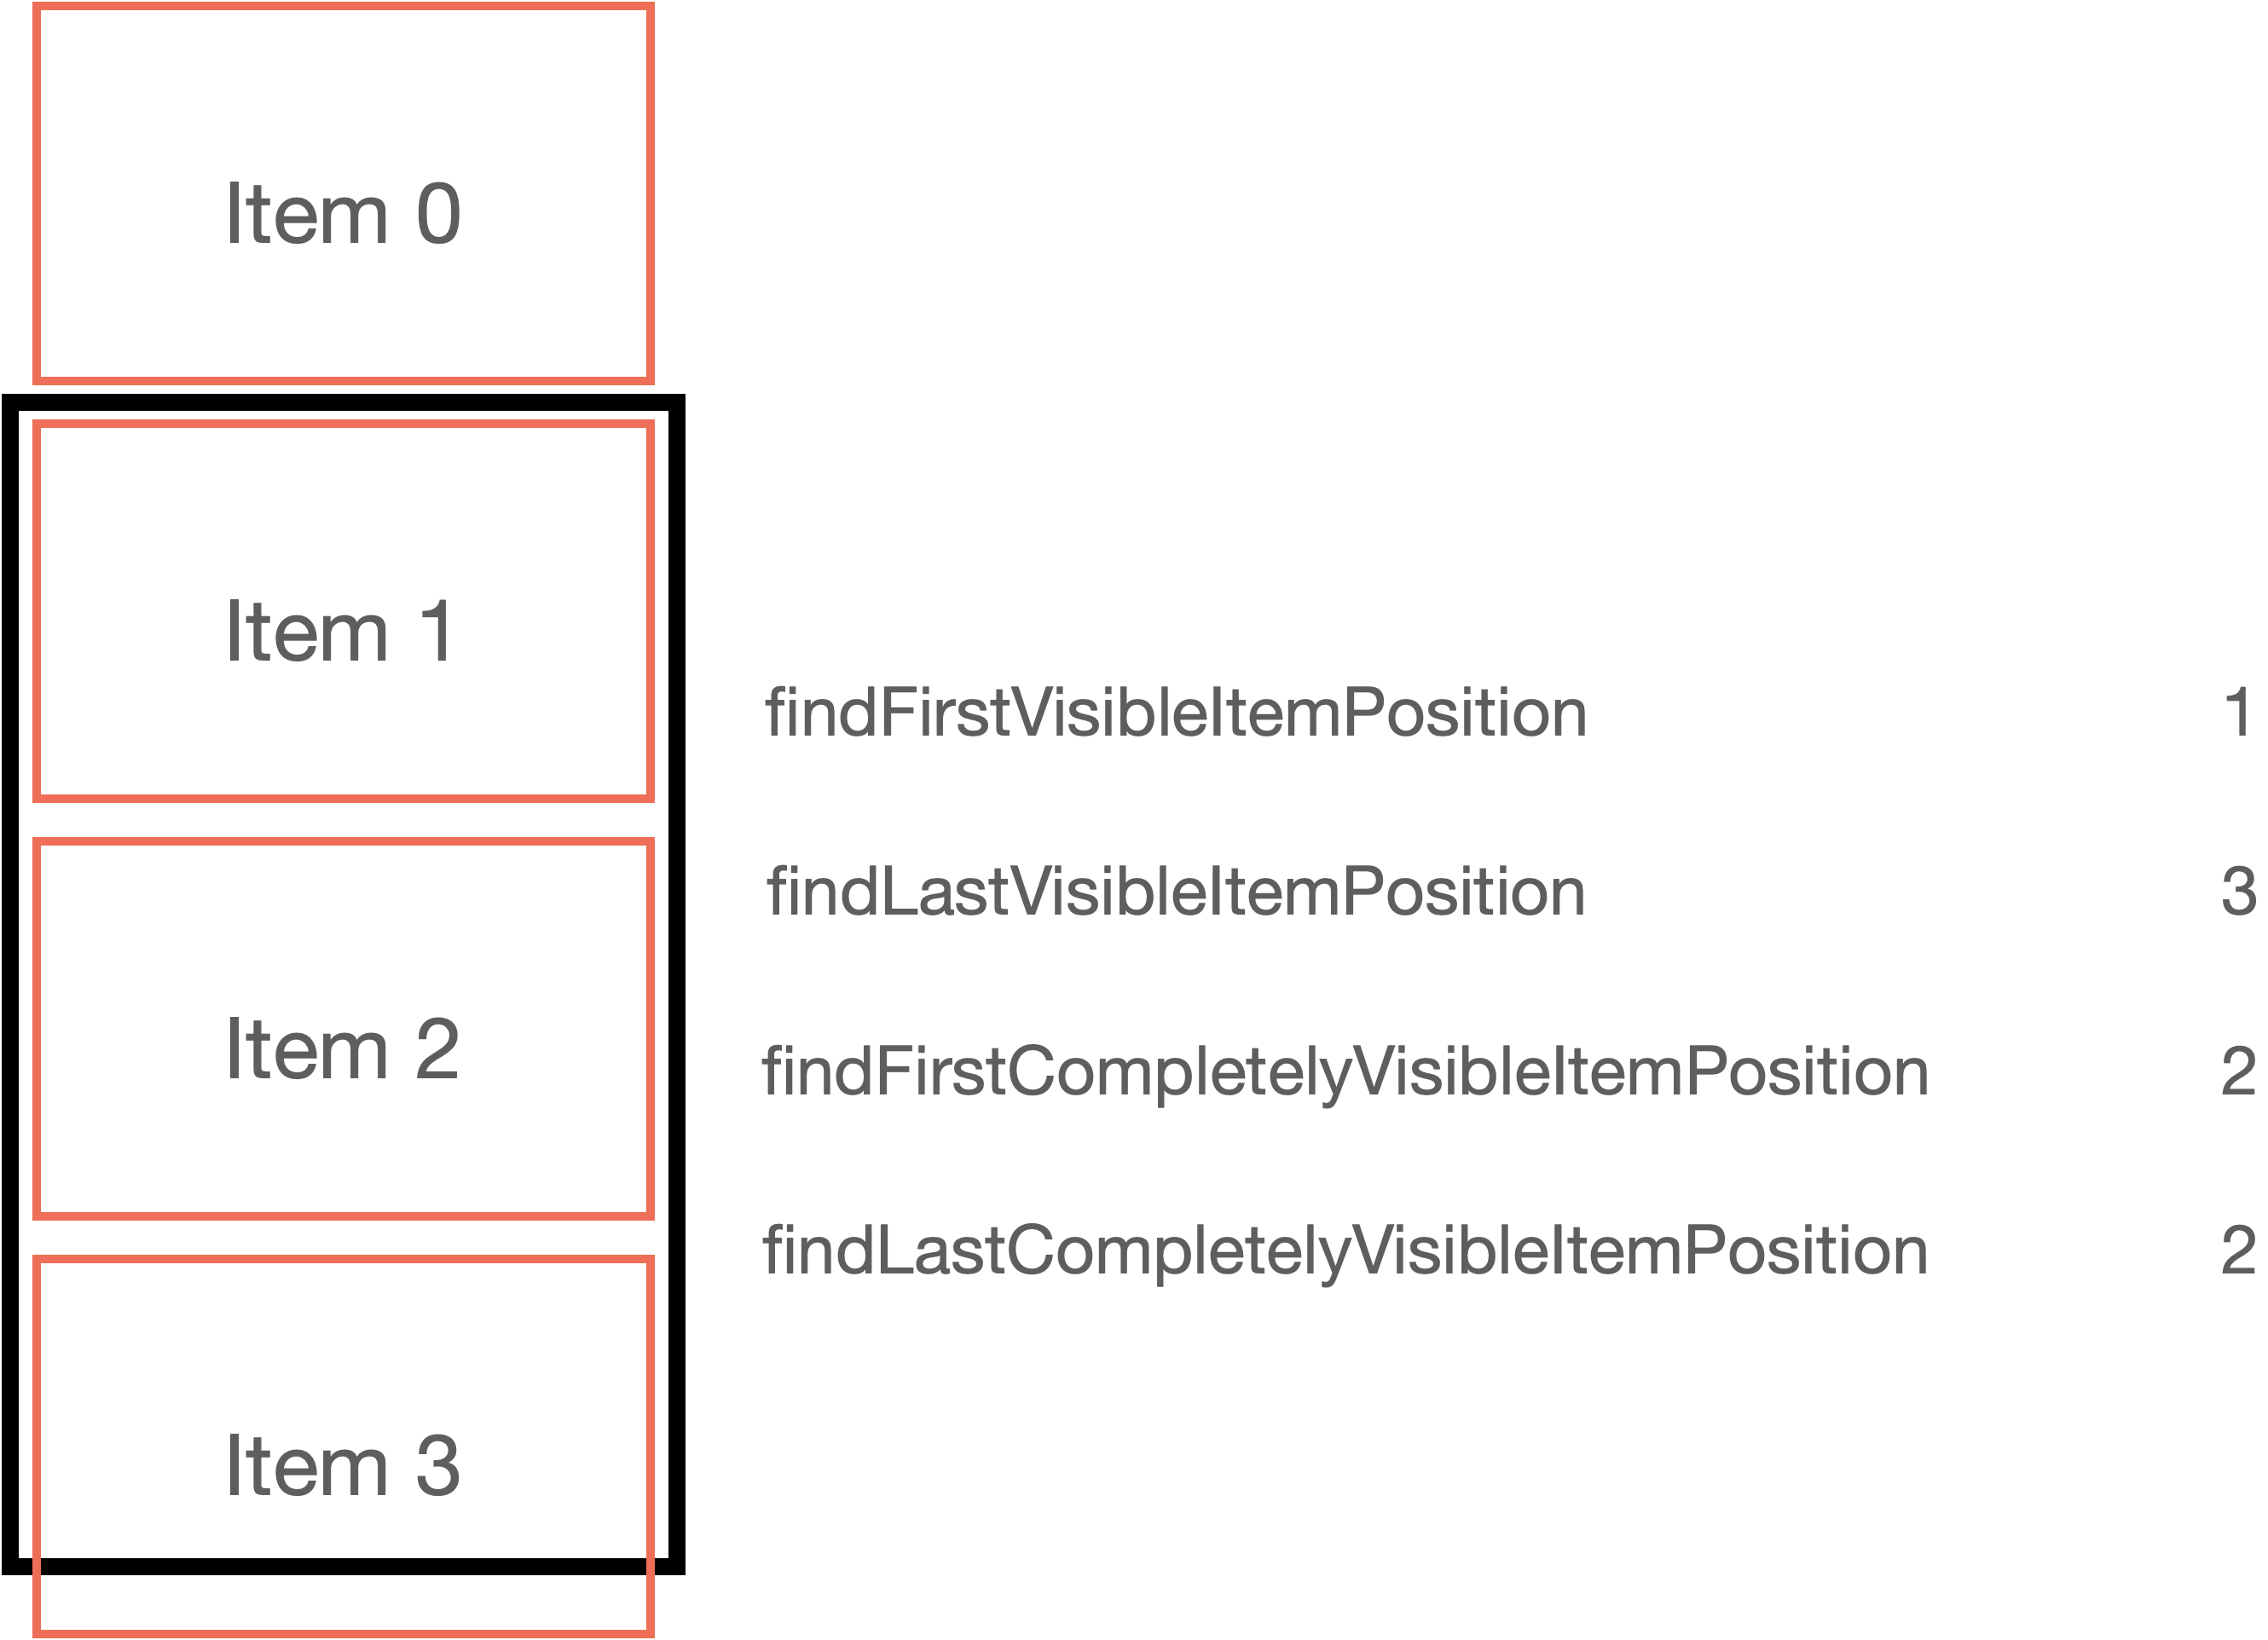
findFirstVisibleItemPosition : 현재 뷰에서 최상단에 보이는 아이템의 위치 (조금이라도 보여도 인식됨)
findLastVisibleItemPosition : 현재 뷰에서 최 하단에 보이는 아이템의 위치 (조금이라도 보여도 인식됨)
findFirstCompletelyVisibleItemPosition : 아이템의 최상단이 완전히 보이는 가장 상위의 아이템
findLastCompletelyVisibleItemPosition : 아이템의 최하단이 완전히 보이는 가장 밑의 아이템
예시
'기술적용' 카테고리의 다른 글
| Glide 구현 (0) | 2022.06.03 |
|---|---|
| Recyclerview, Databinding 연동 (0) | 2022.05.24 |
| Jetpack Navigation, Bottom navigation 연동 (0) | 2022.05.14 |
| Jetpack Navigation 이동 (Fragment -> Fragment) (0) | 2022.05.09 |
| Navigation safe args 구현 (0) | 2022.05.07 |
admob - app-ads.txt 설정
2022. 7. 16. 11:30
순서
| 1. AdMob 사이트에서 APP-ADS.TXT 내용 확인 2. 구글 블로그(https://www.blogger.com/)에 해당 app-ads.txt 생성 3. 구글 플레이 개발자 콘솔에서 개발자 페이지에 웹사이트 주소 설정 |
1. AdMob 사이트에서APP-ADS.TXT 내용확인
[애드몹] - [앱] - [모든 앱 보기] - [APP-ADS.TXT 설정하기]
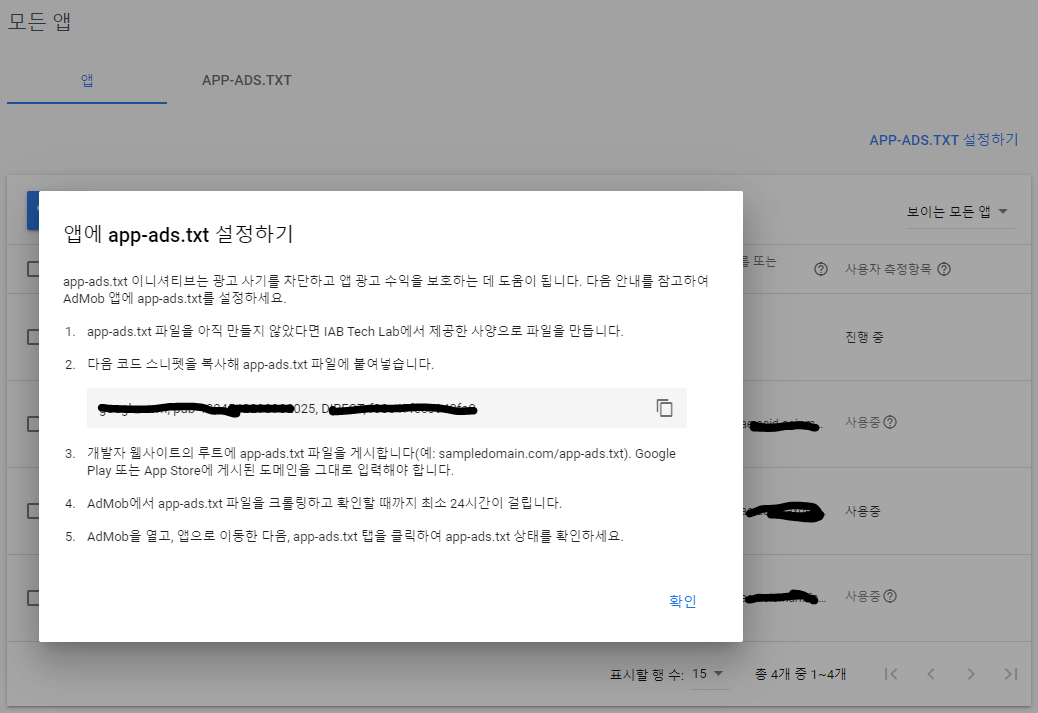
코드 스니펫을 복사한다.
2-1. 구글 블로그(https://www.blogger.com/)에 해당 app-ads.txt 생성
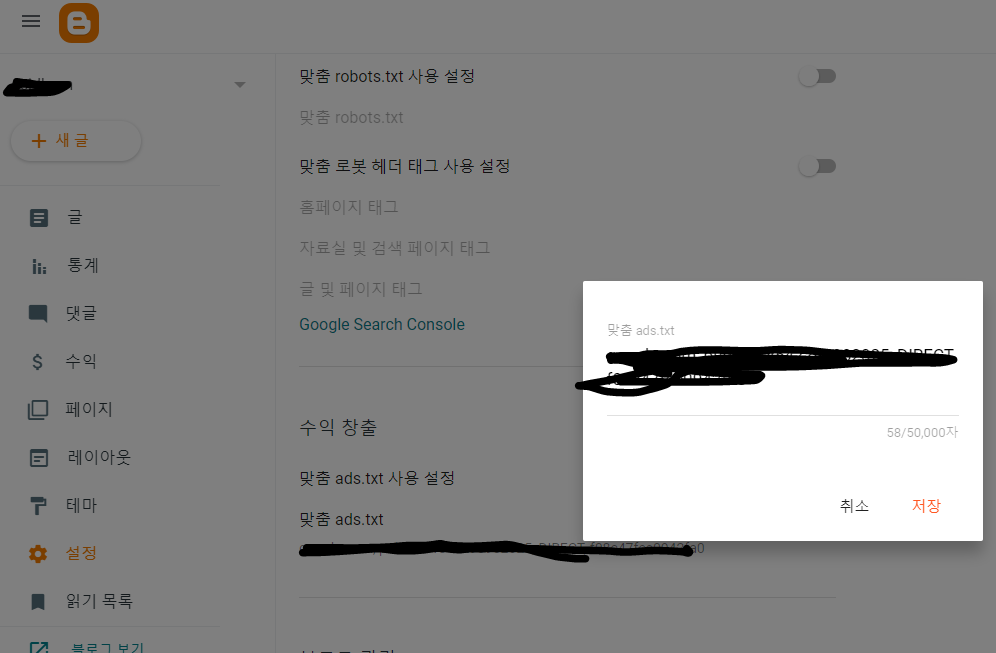
[구글 블로그] - [설정] - [수익 창출] - [맞춤 ads.txt 사용 설정 on] - [맞춤 ads.txt 내용 붙여넣기]
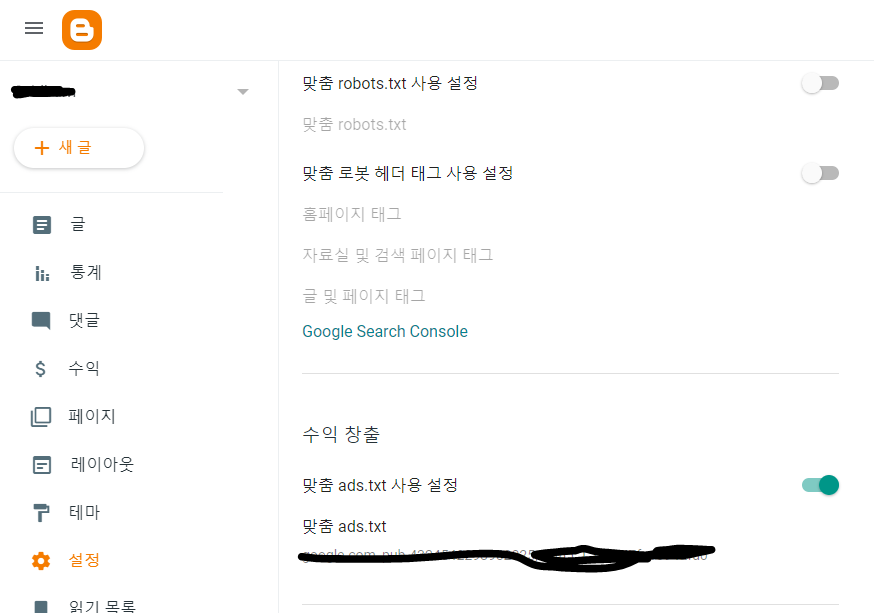
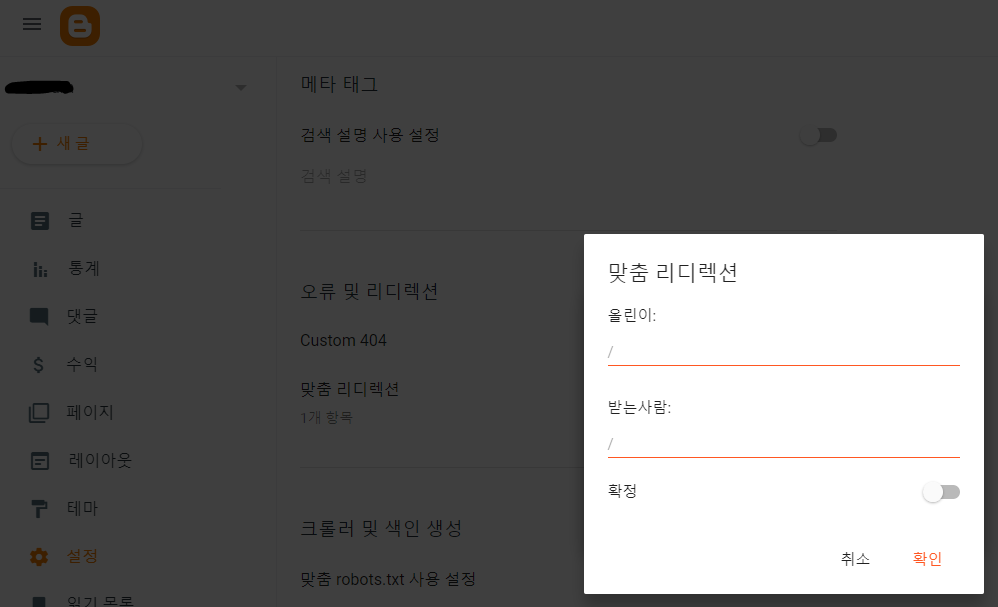
[설정] - [오류 및 리디렉션] - [맞춤 리디렉션] - [추가]
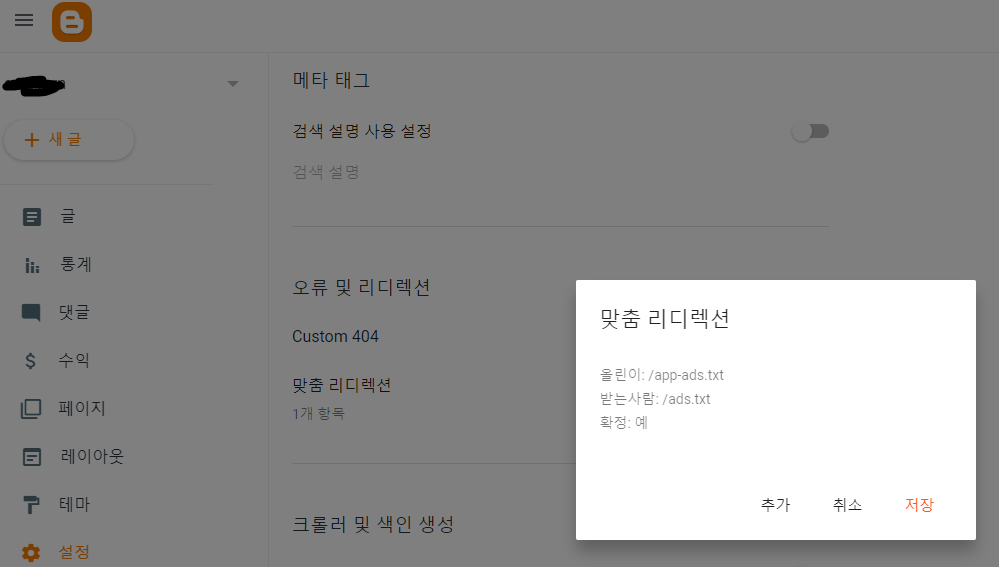
[맞춤 리디렉션]에 아래처럼 입력
올린이: /app-ads.txt
받는사람: /ads.txt
확정 on
[확인] 후 [저장]
[설정] - [게시 중] - [블로그 주소 확인 및 복사]
2-2 테스트
https://내 블로그 주소.blogspot.com/app-ads.txt 로 접속하여 테스트
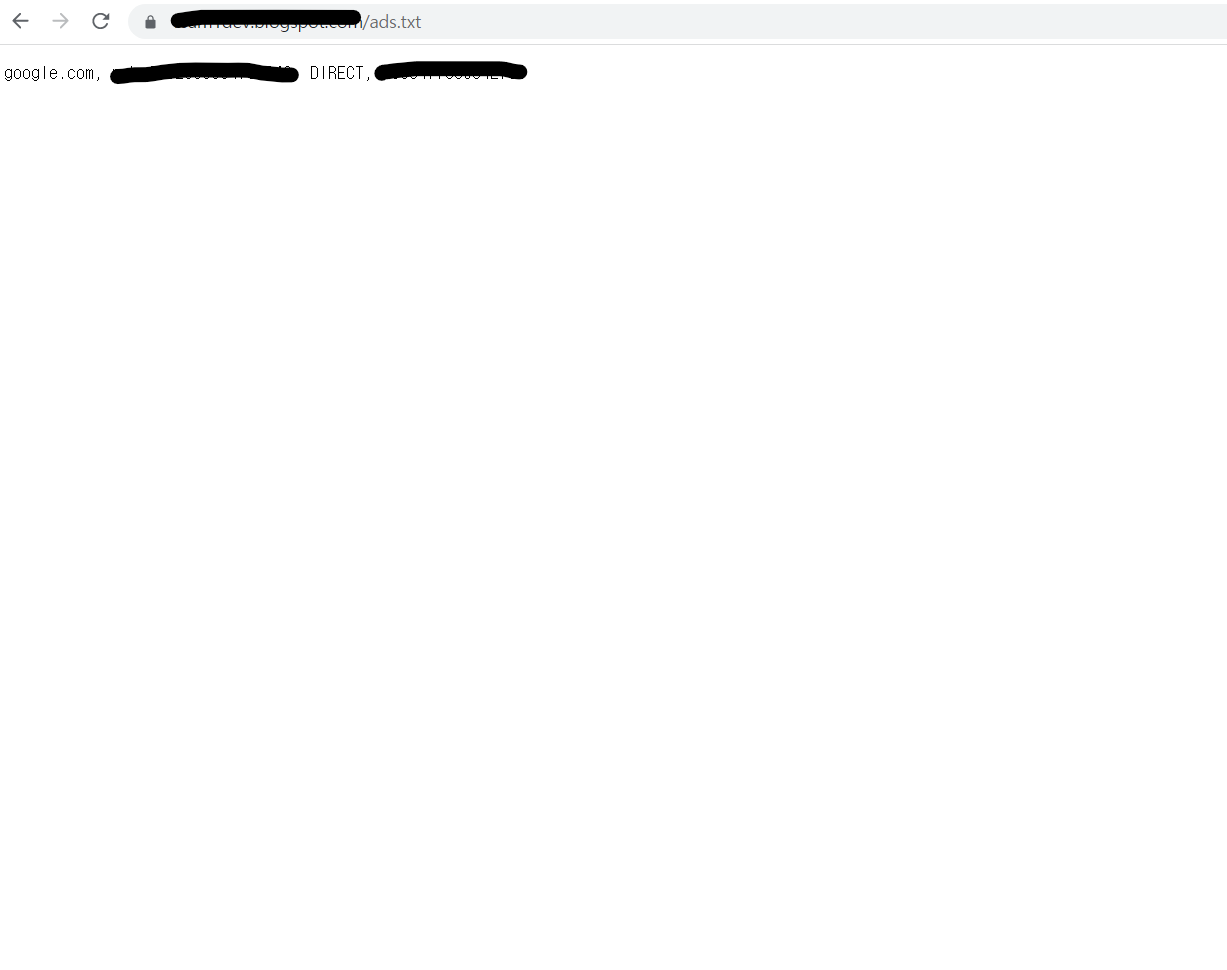
설정이 제대로 되었다면 자신의 스니펫 코드 한 줄만 노출된다.
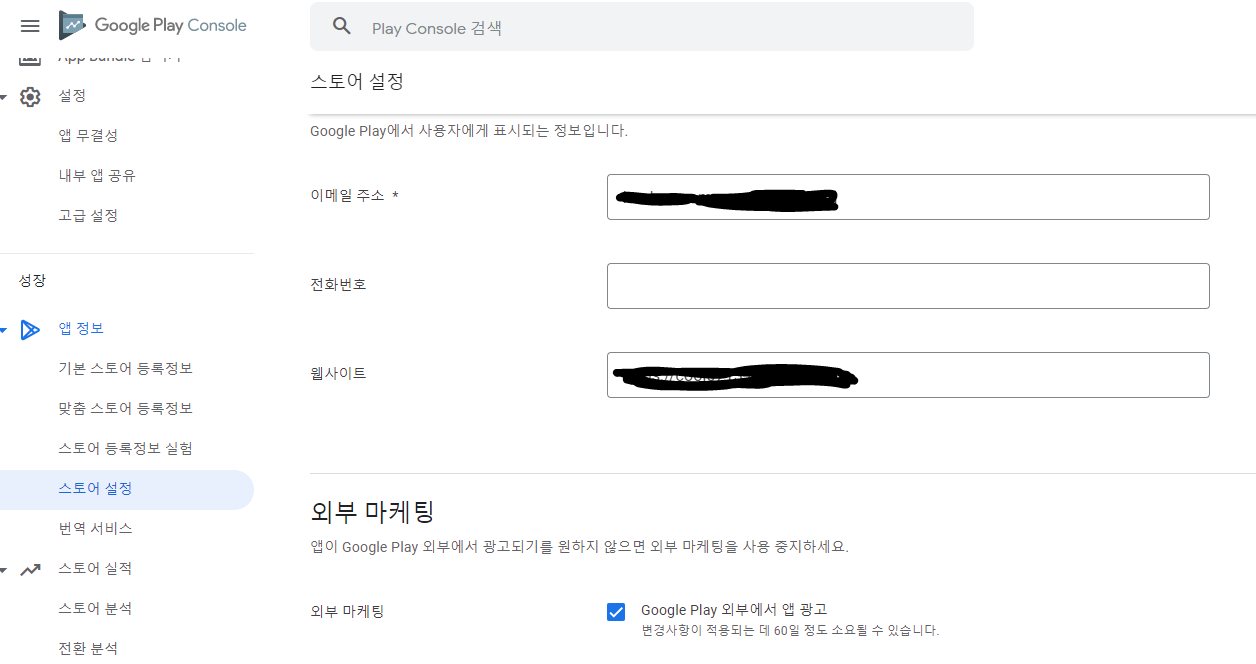
3. 구글 플레이 개발자 콘솔에서 각 애플리케이션 스토어 등록정보 웹사이트 주소 설정
[구글 플레이 개발자 콘솔] - [앱선택] - [스토어 정보] - [스토어 등록정보] - [연락처 세부정보]
[웹사이트] 에 위에서 만든 블로그 주소를 추가하고 [저장]
애드몹에서 확인은 다음날정도에 하면 된다.
[애드몹] - [앱] - [모든 앱 보기] - [APP-ADS.TXT 탭]
'기타' 카테고리의 다른 글
| 특정 브랜치 클론 (0) | 2022.11.13 |
|---|---|
| Git 설치 (0) | 2022.11.13 |
| Button 배경색이 변경되지 않을 경우 (0) | 2022.05.27 |
| Apache License 2.0 (0) | 2022.04.05 |
| 해시 키 얻기 (0) | 2022.04.04 |